|
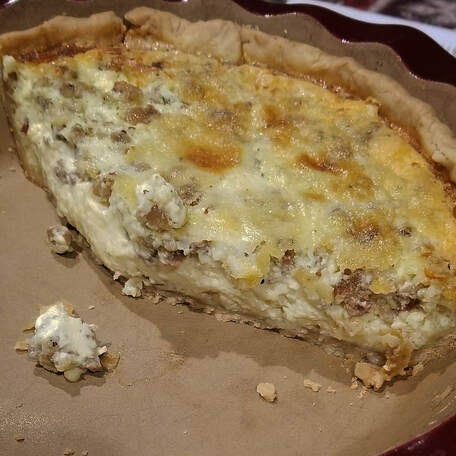
Let's face it...there is good quiche and bad quiche. I rarely order quiche at a restaurant because it's either flavorless or the texture isn't right (it really shouldn't be like scrambled eggs in a pie crust ya'll) in my book. That's correct, not all quiches are created equal...to each is own...and yes, I'm a quiche snob. So, below you'll find the 'base' to a custard style quiche. You're welcome to follow with your preferred filling options and I'll certainly leave notes below on what fillings I use and 'cheat' with for my picky family. NOTE: Although this recipe is simple, it is time consuming. If preparing for a weekend breakfast or brunch I would suggest making it the day before and reheating in the oven or microwaving individual slices prior to serving. XOXO-Melissa Ingredients: (1) Prepared pie crust (PLEASE don't use a pre-made pie crust--quiche is dense and will hold up better with a vegetable shortening and butter combo pie crust recipe), refrigerated Egg mixture: 4 large eggs 1 cup WHOLE milk (fat content is key when making quiche) 1/2 cup heavy cream 2 tsp salt 1 tsp ground black pepper 1 tbsp low sodium/sodium free seasoning blend to match your fillings (I prefer Pampered Chef's Three Onion Rub with almost all filling options) Filling: 1-1 1/2 cups filling (options: pre-cooked sausage crumbles, pre-cooked chopped bacon, chopped veggies etc) 1-1 1/2 cups shredded cheese (mozzarella, Swiss, cheddar...get creative) Directions: **I prefer a heavier pie plate like stoneware or ceramic/pottery for quiche to reduce the risk of burning the crust over glass or metal** Roll out pie crust on lightly floured pastry mat until 1/8" thickness and at least 12" in diameter for a standard 9" pie plate. Trim any jagged edges with a pastry wheel or a small paring knife. Gently fold the pie crust in half, then half again and then with the point of the crust in the center of your pie plate unfold the crust. Lightly push the crust into the corners of the pie plate and flute the edges of your crust (or fold/pinch them under if you have a hard time fluting). Prick the side walls and bottom of the crust with a fork. Put the crust in the freezer for about 20 min. Preheat the oven to 350*F. After the crust has chilled, you're going to 'blind bake' the crust. With a piece of foil much larger than the pie crust, gently line the pie crust with the foil, making sure that the foil is in full contact with the bottom and side walls of the crust and then lightly over the edges of the crust at the top. Fill the pie plate with dry beans to use as weights OR fill the pie plate with balls of foil to help hold the crust in place. Bake for 15 min. While the crust is blind baking-- In a blender (I prefer a Ninja with the large container/blade for this task but a standard blender will work just fine too), combine the ingredients for the egg mixture and blend until fluffy. Remove from the oven. Increase the oven temperature to 375*F. Sprinkle half of the cheese onto the bottom of the pie crust, then follow with the filling and top with the remaining cheese. Then, gently pour the egg mixture over the cheese/filling. Bake uncovered for 20-30 minutes. Then, reduce the oven to 350*F, cover the crust with a pie shield OR gently place a piece of foil over the quiche to prevent the crust from burning and bake another 10-15 minutes until the center isn't completely fluid. You'll want the edges to be set and the middle to start to brown--if at 10-15 minutes you're note quite there you can remove the foil/pie crust shield and let it bake until the middle is light brown--watching your crust so it won't burn. Let the quiche cool on a cooling rack for at least 25-30 minutes before serving. Store covered in the fridge when completely cooled. Enjoy! Basic Quiche Recipe
brunch recipe
0 Comments
Obviously, mine are of the mini variety but this recipe will make a standard 9" pie as well! If making the mini version--this recipe will yield roughly 12. This is yet another one of those almost lost recipes that you don't see often. The texture is similar to the filling of a pecan pie but the peanut butter flavor is out of this world! Enjoy! XOXO-Melissa Ingredients: (1) Prepared pie crust, refrigerated (thawed) 1 1/2 cups corn syrup 1/2 cup granulated sugar 1/2 cup peanut butter (creamy and not 'natural style') 1/4 tsp salt 4 large eggs, room temperature (this is important) 1/2 tsp vanilla (pure extract, not imitation) Directions: Preheat oven to 375*F. Roll out pie crust on a lightly floured pastry pat. If baking in a 9" pie plate, aim for a 12" circle. If making mini pies, aim to roll the dough in any form at 1/8" thickness. Gently place your crust in your pie plate or mini pie forms and flute the edges (or just roll them under around the edge of the pie plate. Then, gently prick the walls and bottom of pie crust with a fork. Place in pie plate and put in the freezer while making the filling. In a stand mixer (or large bowl and use a hand mixer) bowl with whisk attachment, beat the following on medium until incorporated: corny syrup, sugar, peanut butter and salt. Scrape down the sides if needed and turn the mixer on low and add one egg at a time followed by the vanilla. Once the eggs are incorporated/beaten, turn the mixer on medium-high and beat until the mixture has slightly thickened (don't form peaks). Remove your crust/pie plate from the freezer and fill with filling. The filling should come just under the edge of the crust as the filling will rise a little while baking. Bake for 20-30 minutes. Then, turn the oven down to 350*F and place a pie crust shield over the edges OR use a piece of heavy duty foil to lightly cover the pie. Bake for an additional 20-30 minutes until the center is almost set and the filling has puffed a little. Remove the crust shield/foil, cool for 20-30 minutes and serve. This pie is delicious served warm but is great right out of the fridge too! Peanut Butter Pie RecipePie Recipes |
CEO ChatAuthor-
|


 RSS Feed